Showing posts with label girls. Show all posts

Thursday, June 13, 2013

Fairy Houses

  Summer vacation is here which means lots of playing outside, no schedules and tons of free hours to fill. This summer, I'm going to try to do one fun art/craft/science activity each week. A.K.A.: Time to see what things on Pinterest really work.

The first week was fairy houses. The Bean had been ally into making a hiding spot for fairies in our front shrubbery so I thought she'd like to decorate an actual structure. I loaded up on coupons from JoAnn's and we picked up a few wooden bird houses, paint, shiny rocks and other fun, pretty decor. I let the girls paint the outside however they wanted before we had fun with the glue gun. I set the glue gun on low, put a good glop where it was needed and let the girls place what they wanted there.

I love the feathers and grassy puff balls and the shiny rocks are beautiful. I don't know if any fairies have set up shop, but they add fun to our front yard.

Thursday, May 30, 2013

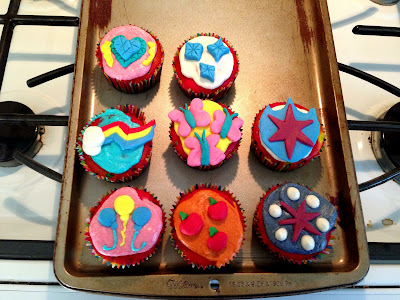
Rainbow Cutie Mark Cupcakes

  The girls wanted a My Little Pony birthday party this year. It was pretty easy, actually. A unicorn piƱata, "pin the horn on the unicorn" and some foil swirl decorations from Amazon (very thankful for Prime and free shipping!) and food from the grocery store and we were good.

We had about 14 kids and 10 or so adults. For a party made up of mostly four- and five-year-old kids, it went amazingly smooth. All the kids, all girls and one boy, played baseball with Grandpa, popped bubbles from the bubble machine and had fun playing dress up. There were no serious meltdowns, just a few normal bouts of sniffles and pouting. I probably used up all my karma, but it was so much fun.

I prefer cupcakes for kids' parties--they're the right size, already portioned out and no on pe has to wait for it all to be cut up.  This year since it was a My Little Pony theme, I made Rainbow Cutie Mark cupcakes. (Cutie marks are the designs on each pony's rump, usually depicting his or her talent.) I just used a white cake mix for the cupcakes, fondant for the designs and frosting for the tops and some design accents. Oh, and food coloring. Lots and lots of food coloring. I got lots of help and inspiration from the Nerdy Yummies video on YouTube.


This was my first time working with fondant. It was pretty easy, much like playing with Play-Doh. My hands were stained for a few days from the gel food coloring, so I'd definitely use gloves next time. I think they turned out nicely, although the butterflies are a tad too large.

For the cupcakes, I made the mix according to the box directions and divided it into six bowls. I tinted each portion a different color: purple, blue, green, yellow, orange and red. I put a scant teaspoon of each color in the cupcake liners, layering    each color. The gel colors turned out really vibrant. All the kids were very excited to pick out and eat one!

Now I have another whole year before I get to do it again.


Saturday, June 11, 2011

Paris Dresses

I love Paris. I've been there twice and can't wait until the girls are old enough and we can take a trip there together. So I was very excited when a friend gave me a dress that had all sorts of whimsical drawings of Paris life on it for the Bean. She loved it. Wore it constantly, especially with her pink cowboy boots. I called it her "Paris, Texas" look.


When she started growing out of it, I wanted to make her a replacement, and I figured I'd make one for the Belly, too. For a brief moment, I thought about making me a matching skirt, but then I realized that would be too twee and I'm not that person.


I found some great fabric with a stylized map of Paris on it at Fabric.com. I already had a simple dress pattern from Butterick, so I was good to go.


My friend S and I decided that the dress by itself "needed" something, so I added 3 hot pink buttons and hot pink grosgrain ribbon trim on the bottom to anchor it. I'm very pleased with the dresses. So much, I'm thinking about making "France-y Pants" lounging pants for me out of the fabric. (I've actually made a few pairs of lounge pants with Paris-theme fabric. More about those later, probably.) But I promise I won't wear them outside of the house when the girls are wearing their dresses.


Sunday, May 22, 2011

More fun with Silhouette

The Bean is slmost done with this year of preschool and she has had a blast. Teacher Appreciation Day was a couple weeks ago, so I decided to make fun gift bags with (store-bought) cookies in them. I decided to go off a "growing" theme, and put some layered flowers on one side, with the words "Thanks for helping me grow" on the other side. And a robot, because the girls looooove robots.


I think they turned out really well. I used adhesive cardstock for the grass, stems and words and just glued on the flowers and robots. I got some flower and ladybug cookies at Whole Foods to put inside. They were a big hit.


The Belly is starting to be a big talker, but still can't pronounce some letters correctly yet. Our favorite is "nuggle" instead of "snuggle". You can hear our hearts melt when says "Nuggle you?" and wants to be picked up. After many requests for "Nuggle you", the Boy thought it would be cute if I made a college-style shirt, like "Nuggle U".

I downloaded an outlined collegiage font, then added "Est. 2009" (they year she was born), under the words. I printed it out onto heat-transfer paper and ironed it onto a plain white shirt. When the Boy came home and saw it on the table, he burst out laughing because it was perfect.


Thursday, May 5, 2011

Girly Robot T-Shirts

I have extremely girly girls. They don't like wearing pants, only skirts or dresses, and they have inherited my "sparkly shoe fascination" gene. Yet, we haven't hit the "princess phase" yet. Instead, both girls love robots.


I think it mostly comes from Plex on Yo Gabba Gabba and Wall-E. I found the movie Robots on massive sale at Target and it's been The Bean's most requested thing to watch so far. (It doesn't make my ears or eyes bleed, so that's a bonus for me, too.)


Thanks to the crafty evil influence (and that actually is a compliment) of my friends S and V, I bought a Silhouette cutting machine. This thing is awesome--you can make iron-on transfers with your ink-jet printer, amazing cards and paper crafts, and even iron-on appliques. As if JoAnn and Michaels didn't get enough of my money already...


My first project was to make girly robot shirts for the girls. I got some hot pink heat transfer vinyl and a robot template from the Silhouette store and plain white shirts at Target. I sized the template to a good size, sent the heat transfer through the machine, took out the extra pieces and ironed the robot shape to the shirts.


I got massive "mom points" for a fairly easy and quick project.


This is The Belly smiling. I love the scrunchy eyes.


The Bean, giving me her best "I love this shirt" pose.