Showing posts with label baking. Show all posts

Tuesday, July 16, 2013

Homemade Marshmallows

  The girls have been on a marshmallow kick lately. No roasting or toasting required, just eating one or two straight out of the bag for a treat. For the 4th, we were going to have friends over for grilled steak, wine and sparklers, so I figured we'd set up the fire pit and make S'mores. So I decided we could make homemade marshmallows for a fun activity.

Between trying to keep kids away from the boiling sugar syrup, beaters and other kitchen dangers, I didn't get any pictures of the process. But, the Barefoot Contessa's recipe isn't that difficult (and doesn't use egg whites, for those who sure vegetarian  or have allergies), just fairly sticky. Next time, I'll probably spray the pan with vegetable oil, then dust with powdered sugar because mine stuck to the sides and wouldn't slide out of the pan when I turned it upside down.

Tip: Use a pizza cutter (or thin, sharp knife) sprayed with vegetable oil and cutting is a breeze. I tossed them in a little more powdered sugar and had no problems with them sticking together.

Everyone agreed they were the best marshmallows they'd ever had. My friend's toddler kept grabbing the bag and stuffing them in her mouth (which is one way to keep little ones awake for fireworks).


I think these need to be part of my holiday baking routine, maybe flavored with peppermint and dipped in chocolate. 

Thursday, May 30, 2013

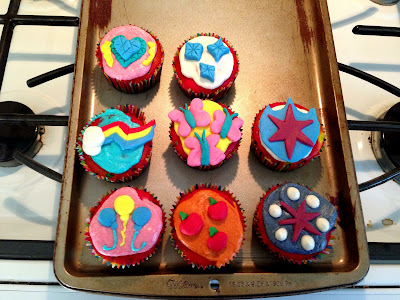
Rainbow Cutie Mark Cupcakes

  The girls wanted a My Little Pony birthday party this year. It was pretty easy, actually. A unicorn piƱata, "pin the horn on the unicorn" and some foil swirl decorations from Amazon (very thankful for Prime and free shipping!) and food from the grocery store and we were good.

We had about 14 kids and 10 or so adults. For a party made up of mostly four- and five-year-old kids, it went amazingly smooth. All the kids, all girls and one boy, played baseball with Grandpa, popped bubbles from the bubble machine and had fun playing dress up. There were no serious meltdowns, just a few normal bouts of sniffles and pouting. I probably used up all my karma, but it was so much fun.

I prefer cupcakes for kids' parties--they're the right size, already portioned out and no on pe has to wait for it all to be cut up.  This year since it was a My Little Pony theme, I made Rainbow Cutie Mark cupcakes. (Cutie marks are the designs on each pony's rump, usually depicting his or her talent.) I just used a white cake mix for the cupcakes, fondant for the designs and frosting for the tops and some design accents. Oh, and food coloring. Lots and lots of food coloring. I got lots of help and inspiration from the Nerdy Yummies video on YouTube.


This was my first time working with fondant. It was pretty easy, much like playing with Play-Doh. My hands were stained for a few days from the gel food coloring, so I'd definitely use gloves next time. I think they turned out nicely, although the butterflies are a tad too large.

For the cupcakes, I made the mix according to the box directions and divided it into six bowls. I tinted each portion a different color: purple, blue, green, yellow, orange and red. I put a scant teaspoon of each color in the cupcake liners, layering    each color. The gel colors turned out really vibrant. All the kids were very excited to pick out and eat one!

Now I have another whole year before I get to do it again.


Wednesday, April 3, 2013

Easter Cookies

  For our annual Easter Egg Hunt last weekend, I wanted to make a fun, cute, kid-friendly dessert. Last year, I made cupcakes (which I apparently didn't write about...) and the year before I made Bunny Cake Pops. This year, I was inspired by the King Arthur Flour catalogue and made Easter Cookies.

I used their Sugar Cookie and White Icing mixes with some Wilton cookie cutters. I made the dough one day, rolled them out and baked the next day and decorated on the last day. I wanted to try the "flood icing" technique, but I don't think my royal icing was runny enough and I didn't feel like mixing all my colors twice, so I just went with it. I piped the frosting, spread with a knife and smoothed out any bumps with a wet finger. They turned out really cute, if I do say so myself.


Friday, March 1, 2013

Peppermint Marble Loaf Cake

I love the combination of peppermint and chocolate. The York Peppermint Patty creamer makes me very happy in the morning. This easy marble loaf cake is like the creamer in cake form. 

Marble Loaf Cake Recipe from Baking From my Home to Yours by Dorie Greenspan

Ingredients

2 Cups Flour plus 2 Tbsp All-Purpose Flour
1 ¼ tsp Baking Powder
½ tsp Salt
1 ½ Sticks (12 Tbsp) Unsalted Butter, at room temperature
1 Cup Sugar
4 Large Eggs
½ tsp Pure Vanilla Extract
½ Cup Whole Milk
4 oz Bittersweet Chocolate, melted 
4 oz White Chocolate, melted
1/4 tsp Peppermint Extract

Method

Preheat the oven to 325˚F. Butter an 8 ½ x 4 ½ x 2 ½-inch loaf pan, dust the inside with flour and tap out the excess. Place the pan on an insulated baking sheet or 2 regular baking sheets stacked one on top of the other.

Whisk together the flour, baking powder and salt.

Working with a stand mixer with a paddle attachment, or with hand mixer in a large bowl, beat the butter on medium speed until smooth, about 3 minutes. Add the sugar and beat for another 2 to 3 minutes. Add the eggs one at a time, beating well after each addition. Don’t be concerned if the batter curdles and stay curdled-it will be fine. Beat in the vanilla. Reduce the mixer speed to low and alternately add the flour mixture in 3 additions and the milk in 2 (begin with the dry ingredients), mixing only until each addition is incorporated.

Divide the batter in half and stir the melted bittersweet chocolate into one half and the melted white chocolate and peppermint extract into the other. Drop spoonfuls of dark and light batter randomly into the pan, and then plunge a table knife deep into the batter and zigzag the knife through the batter. For maximum peppermint contrast, only zig and zag a few times. 

Bake the cake for 1 hour and 20 to 30 minutes, or until a thin knife inserted deep into the center comes out clean. If the cake looks as if it’s getting too brown during its bake, cover loosely with a foil tent. Transfer the cake to a cooling rack and let it rest for about 15 minutes before unmolding, then cool the cake to room temperature right side up on the rack.


Thursday, October 4, 2012

Pull-Apart Cinnamon Apple Bread

Since the apple pie and cake were so successful, I wanted to find another way to use the apples from our tree.  Luckily, I get the email newsletters from King Arthur Flour and one had a link to a delicious-looking Pull-Apart Cinnamon Apple Bread.

This is an amazing recipe to make on a nice fall day.  The filling, with apples, cinnamon and brown sugar, fills the house with an amazing aroma.  It's a yeast bread, so there's a few hours where the dough has to rise, so plan accordingly.  And be ready to make a bit of a mess.  The filling is a little syrup-y and will ooze when you cut and stack the bread.  It might look like a hot mess and you'll doubt this will work, but never fear. After rising and then baking, it will all turn out okay.

It is definitely amazing warm with butter on it, but I'm wondering what other toppings would be delicious.

Tuesday, August 28, 2012

Green Apple Pie and Cake

One of the many things I love about my new(ish) house is the apple tree in our backyard.  We weren't sure for a while what kind of apples were on it, but one day, we took the plunge and bit into one.  It's kind of a cross between a Granny Smith and a Golden Delicious--crisp, but not too sweet or tart.  Just very apple-y.

From Minus Minions

It's fun to go up to the tree and pick some fruit for munching, but I knew I had to find recipes quick.  Apple pie, naturally, and some kind of apple cake.

The Green Apple Pie was pretty easy to make.  I made the crust in my food processor, since I was in a bit of a hurry.  The only difficult thing was peeling and slicing the apples.  They're a bit smaller than the store-bought kind, so I had to use 12 to get the amount I needed.


It was a hit.  The crust was nice and flaky and it the filling wasn't overly sweet.  I may add a touch more spice next time, but it was a great first attempt.

The Green Apple Cake is soft, spicy with nice chunks of apple spread through it.  The topping is a caramel-coconut mixture that's browned a bit with the broiler.  The Boy really liked it. And he said it tasted even better because the apples came from our own tree.

Tuesday, July 31, 2012

Salted Chocolate Caramel Pretzel Bark

This is the best PMS food, ever.  It's salty, sweet, crunchy, chewy and insanely easy to make.  Don't be afraid of the word "caramel" in the title. The sugar and butter is cooked for a few minutes on the stovetop, then the rest of the cooking happens in the oven.

I made my batch on a 11x17 sheet pan and I had *just* enough caramel and chocolate.  It would probably work better on a 10x15 pan, or you could always make a bit more caramel and use more chocolate for the larger amount.

Go and make this now.nyou won't be sorry.

Wednesday, July 11, 2012

Garden Birthday Cupcakes

Since the girls' birthdays are so close together, we throw them a joint birthday party.  This means combining theme preferences. Last year, we had an Emo/Transformers party, which was interesting.  This year, the girls like butterflies and ladybugs (but still like Elmo and robots) and I was able to find "Garden Girl" themed partyware at a store, so I knew they'd be happy.

I was away the weekend before and went back and forth a bunch whether I wanted to make the cake/cupcakes myself or have a bakery do it.  I remembered one of the guests has a peanut allergy, so I decided to go ahead and make it myself.  The mixes from King Arthur are peanut (but not tree nut) free, delicious and easy.  I hadn't figured out how to decorate them until the actual morning of the party.

Amazingly, my decorating tips and bags had been unpacked.  The only hitch was that I only had 3 coupler sets, but wanted to use 6 colors.  I just cut off a small bit of the tip for the yellow and red to make the bee and ladybug bodies, put a small round tip in the bag with the black icing, and used the couplers for the pink, purple and green.


Not bad for 30 minutes, a bunch of icing and no plan.

Friday, May 18, 2012

Rubik's Cube Cake

I'm a child of the 80's.  I have fond memories of MTV, The Breakfast Club and Family Ties.  I bought more issues of Teen Beat than I'd care to admit.  So it's no surprise that the book Ready Player One really pushed all my buttons.  So to speak.

I'd just finished re-reading it when I went through my "baking projects to try" list and I found a Rubik's Cube Battenburg Cake recipe.  Dude, how awesome is that?

I improvised a baking pan, the same way I did the last time I made a Battenburg.  I made all the batter at once in my KitchenAid, measured out 6 equal amounts into bowls and dyed them with food coloring.
From Minus Minions

I cut each color into 2 and started assembling.  I didn't cut each piece so every slice would be different, but I did cut some smaller pieces and glude them together so some of the slices would be different.
From Minus Minions

The Boy was slightly confused when he came home.  Then he saw the actual cube next to the cake and it all slid into place. A very delicious, tea-cake kind of place.
From Minus Minions


Tuesday, January 24, 2012

Ombre Chocolate Cake

I've been dreaming of making i am baker's rose cake for a while. It's so beautiful and, from her description, pretty easy to make. I was stuck on what cake to pair it with. I found the Black Magic Cake, which looked deep, dark, and decadent. I was going to use raspberry jam for the filling and simple buttercream (made with a combo of butter and shortening) for the roses.

Despite my best intentions, things didn't turn out quite the way I expected. Mostly due to user error.


The cake is incredibly simple to make. It is very moist, deep and decadent and delicious. However, I underbaked it just a touch, which made constructing the layers a little hard. And the crumb coat wasn't great because the moist cake kept, well, crumbling.


My second issue arose when, for some bizarre reason, I decided to decorate the cake while the girls were awake and running around. Now, while the rose technique is easy, you definitely need a chunk of uninterrupted time to get the crumb coat done well, especially on this cake recipe. In short, I needed more of my attention, and more icing, than I could give at the moment, so I scrapped the rose idea.


I found a great ombre variation of the rose cake, which has also been kicking around in the back of my head. I had an idea to make a chocolate ombre frosting design, I just needed to go to the store to get some frosting. I didn't have enough of my buttercream to finish the cake, and I didn't have enough powdered sugar to make any more. Also, I was just at that phase where I wanted to get the damn thing done.


What happened next was a lemons-into-lemonade moment. After our playdate, I went to give the girls a bath before naps, only to discover we had no water. A call to the water company revealed there were a bunch of main breaks in the area and who knew when we'd get water back. I pack up the girls, in their pjs, to go to the store to get bottled water, paper plates, and... chocolate and vanilla fosting.


Fate has a great sense of humor, because water was back when we got home.


By this time, I was too tired to even pipe any frosting, so I just mixed and smeared around the cake. In about 10 minutes, I had an ombre chocolate cake. And, it looked fairly good, much to my surprise.


Now, I'm going to say something shocking: while I like frosting, I don't like massive amounts of frosting. I also don't like avocados, so, who knows. Next time I make this, I'll probably do a Dream Whip or whipped cream-type frosting. The cake is dark and lucious, but it doesn't really need a "big" frosting to balance it out.


I will definitely try both the cake recipe and the rose technique again. But only during naptime.

Friday, December 30, 2011

Holiday Baking

It's been a while, hasn't it? Somehow time got away from me after Thanksgiving. I got started with my usual holiday baking and sweets making, then I decided I really wanted a dog (Our first dog, Buddy, passed away in May), and I've been busy with our new dog, Mr. Baggins, and trying to entertain the girls during Winter Break from preschool.

I made the usual cookies this year, and tried a few new recipes, too. My mom and I would make Spritz cookies during our CookiePalooza, and I still had the cookie press, and I thought the girls could help me decorate them, so I made a couple batches of dough. What I forgot was how tempermental both the press and dough are. If the dough is too cold, it won't come out of the press. If it's too warm, it won't stick to the parchment paper. And, in a kitchen with an oven going, I found it frustrating to find that magic dough constistency. And trying to explain this problem to a 3-year-old who's excited for sparkly cookies doesn't go well. I did get the cookies made, but I don't think I'll make them again. They are delicious, but, compared to the other doughs and their ease of baking, it's not worth the effort for me.

I did find success with Salted Caramel Sortbread. They're seriously easy and insanely delicious. I've never made shortbread with melted butter, but it's genius.

May you have a happy, and decadent, new year!

Thursday, November 17, 2011

Peanut Butter Cup Mousse Cake

I made this cake years ago for a friend's birthday, then filed the recipe away for safekeeping. I found it a little while ago and just had to make it again. It's definitely complicated, but if you can spread the work out over a few days, it's manageable. I made the cake the first day, made the mousse and assembled the cake the next day, and glazed it the third day.

It's amazingly light, considering it's chocolate and peanut butter. The chiffon cake is spongy, and the mousse is creamy and not overwhelming, thanks to the whipped cream. I think the peanut topping is important, texture wise, as it adds a nice crunch to all the light smoothness.

I found the recipe in the now-gone Chocolatier Magazine, but it looks like the Godiva version is really similar. My recipe substitutes cocoa powder for the Godiva Dark Truffle Hot Cocoa Powder and decreases the amount of milk chocolate in the glaze.

Cocoa Chiffon Cake:
1/2 cup plus 2 tablespoons sifted cake flour
1/2 cup plus 3 tablespoons granulated sugar
1/2 cup cocoa powder, sifted
1/2 teaspoon baking powder
1/8 teaspoon salt
2 eggs plus 3 egg whites, at room temperature
1/4 cup plus 2 teaspoons vegetable oil
2 teaspoons vanilla extract

Peanut Butter Mousse:
1 3/4 cups (10 ounces) peanut butter chips
3/4 cup whole milk
1/2 cup creamy peanut butter
1 tablespoon vanilla extract
1 cup heavy cream
2 tablespoons confectioner’s sugar

Milk Chocolate Glaze:
8 oz. Milk Chocolate, coarsely chopped
1/2 cup plus 2 tablespoons heavy cream
1 teaspoon vanilla extract

Garnish
1/3 cup unsalted roasted peanuts, finely chopped

Make Cake:
1. Position rack in center of oven and preheat to 350ĀŗF. Lightly butter bottom and sides of a 9-inch round cake pan. Line with a circle of baking parchment or waxed paper. Dust side of pan with flour and tap out excess.
2. Stir together flour, 1/2 cup sugar, cocoa, baking powder and salt in medium bowl.
3. In large bowl, whisk together 2 whole eggs, oil and vanilla until frothy. Sift flour mixture over egg mixture and stir until smooth. Mixture will be stiff.
4. In a grease-free medium mixer bowl, with the whisk attachment, beat egg whites until frothy. Gradually increase speed to medium-high and continue to beat until they start to form soft peaks. Add remaining sugar, 1 teaspoon at a time. Continue to beat until egg white mixture forms a stiff, shiny meringue.
5. Using large rubber spatula, gently fold 1/3 egg white mixture into the egg- flour mixture to lighten it. Fold in remaining egg white mixture. Do not over mix batter. Scrape into prepared pan and spread evenly with a spatula.
6. Bake for 15 minutes or until cake springs back when gently touched in center. Cool cake in pan 5 minutes. Invert to wire rack and cool completely.

Make Mousse:
1. Put peanut butter chips into large bowl. In small saucepan, heat milk to a gentle boil. Pour hot milk over peanut butter chips. Let stand 30 seconds. Whisk until smooth and add peanut butter and vanilla. Let stand 5 minutes or until tepid.
2. In chilled bowl, beat cream and confectioner’s sugar just until soft mounds barely start to form and cream in still pourable. Do not over beat cream. Gently fold 1/3 whipped cream mixture into peanut butter mixture to lighten it. Fold in remaining whipped cream. Do not over mix mousse or it will become grainy.

Assemble Cake:
1. Lightly oil bottom and side of a 9-inch fluted tart pan with removable bottom. Line bottom and ides of pan with plastic wrap, smoothing out any wrinkles, and pressing it into ridges on sides of pan. Scrape peanut butter mousse into pan and spread it in an even layer, filling in all fluted indentations in side of pan with mousse.
2. Remove paper circle from bottom of cake. Place cake on top of mousse in tart pan and gently press into place. Cover layer of cake with plastic wrap. Freeze for 3 hours or until firm.
3. Remove plastic wrap from cake and invert onto a cardboard cake round. Lift off side and bottom of tart pan, using a thin bladed knife if necessary. Peel off plastic wrap from peanut butter mousse layer.

Make Milk Chocolate Glaze
1. Put milk chocolate in medium bowl. In small saucepan heat cream to a gentle boil. Pour hot cream over chocolate. Let mixture stand for 30 seconds. Whisk until smooth. Stir in vanilla.. Cool glaze until it starts to thicken slightly.
2. Place cake on a wire rack over baking sheet. Pour milk chocolate glaze over cake, covering it completely. Refrigerate on wire rack for 5 minutes or until glaze is set. Sprinkle cake with chopped peanuts and refrigerate until serving.

Saturday, October 22, 2011

Chocolate Cherry Cake

This cake is delicious and easy. And gorgeous and impressive. And people will love you for it.

It's the Chocolate-Covered Cherry Cake from Beki Cooks Cake blog. Her taste test on fondant was interesting and helpful. I don't use fondant, but maybe I'll start branching out.

For my cake, I baked the batter in 2 8" rounds, chopped up some of the extra maraschino cherries for the filling and used a buttercream icing mix, which had meringue powder already in it.

My ganache topping wasn't as smooth as hers, but I was more interested in getting the "drips" right than smoothing out the top. It gives it... character, right?

When my friends took their first bite, there was no sound but muffled "mmmmm"s in the room. I love the chocolate/vanilla buttercream combination and the ganache and cherries added even more texture and dimension. I almost cried when I ate the last piece the other day.

Thursday, September 22, 2011

Black and White Chocolate Cake

Sometimes a recipe just jumps out from a blog, website, book, etc. For me, the latest to catch my eye was the Black and White Chocolate Cake from Dorie Greenspan's From My Home to Yours.

(Actually, I've been dying to make the cake on the cover ever since I got the book, but I need to find a good high-altitude 7-Minute Icing recipe.)

I liked the combination of chocolate flavors, that it was a little more intricate than the things I'd been baking lately, and that it had components that I could make in stages, ahead of assembling time.


I didn't have any chocolate bars large enough for shavings or curls, so I made a stencil with my Silhouette and dusted the top with cocoa powder. It's not as clean as I'd like, but it wasn't bad for a first try. The design is fairly intricate, and I needed to press the stencil into the white chocolate cream more so the cocoa powder wouldn't "bleed" underneath it.


The layers weren't as clean as I'd like. As a habit, I automatically halve the chemical leavener in any recipe to adjust for altitude, but I think I needed to leave a little more in so the layers would be higher. (Also, my cutting technique could use some help.)


It's a very delicious, fancy-looking, make-ahead cake. I definitely liked experimenting with the stencil and need to find another recipe to try it with soon.


Black-And-White Chocolate Cake

For the Cake:


  • 2 cups cake flour

  • 2 t baking powder

  • 1/8 t baking soda

  • 1/4 t salt

  • 1 1/4 sticks (10 T) unsalted butter, room temp.

  • 1 cup sugar

  • 3 large eggs

  • 1 large egg yolk

  • 1 t pure vanilla extract

  • 3/4 cup buttermilk


For the Dark Chocolate Cream:


  • 2 cups whole milk

  • 4 large egg yolks

  • 6 T sugar

  • 3 T cornstarch, sifted

  • 1/4 t salt

  • 7 oz bittersweet chocolate, melted

  • 2 1/2 T unsalted butter, cut into 5 pieces, at room temp


For the White Chocolate Whipped Cream:


  • 6 oz premium quality white chocolate (such as Valrhona Ivoire or Guittard), finely chopped

  • 1 1/2 cups heavy cream


Chocolate shavings or curls for decoration (optional)


Getting Ready:
Center a rack in the oven and preheat the oven to 350degrees F. Butter two 9 x 2 inch round cake pans, dust insides with flour, tap out the excess and line the bottoms of the pans with parchment or wax paper. Put the pans on a baking sheet.

To Make the Cake:
Sift together the cake flour, baking powder, baking soda and salt.Working with a stand mixer, preferably fitted with a paddle attachment, or with a hand mixer in a large bowl, beat the butter on medium speed until soft and creamy. Add the sugar and beat for another 3 minutes. Add the eggs one by one, and then the yolk, beating for 1 minute after each addition. Beat in the vanilla; don't be concerned if the mixture looks curdled. Reduce the mixer speed to low and add the dry ingredients alternately with the buttermilk, adding the dry ingredients in 3 additions and the milk in 2 (begin and end with the dry ingredients); scrape down the sides of the bowl as needed and mix only until the ingredients disappear into the batter.

Divide the batter evenly between the two pans and smooth the tops with a rubber spatula.Bake for 28 to 30 minutes, rotating the pans at the midway point. When fully baked, the cakes will be golden and springy to the touch and a thin knife inserted into the centers will come out clean. Transfer the cakes to a rack and cool for about 5 minutes, then unmold, remove the paper and invert to cool to room temperature right side up on the rack.


To Make the Dark Chocolate Cream:
Bring the milk to a boil.

Meanwhile, in a large heavy-bottomed saucepan, whisk the egg yolks with the sugar, cornstarch and salt until thick and well blended. Whisking without stopping, drizzle in about 1/4 cup of the hot milk--this will temper, or warm, the yolks so they won't curdle--then, still whisking, add the remainder of the milk in a steady stream. Put the pan over medium heat and, whisking vigorously, constantly and thoroughly (make sure to get into the edges of the pan), bring the mixture to a boil. Keep at a boil, still whisking, for 1 to 2 minutes. Remove the pan from the heat.

Whisk in the melted chocolate, and let stand for 5 minutes. Then whisk in the pieces of butter, stirring until they are fully incorporated and the chocolate cream is smooth and silky. Press a piece of plastic wrap against the surface of the cream to create an airtight seal and refrigerate the cream until chilled, or for up to 3 days. Or, if you want to cool the cream quickly, put the bowl with the cream into a larger bowl filled with ice cubes and cold water and stir the cream occasionally until it is thoroughly chilled, about 20 minutes.


To Make the White Chocolate Whipped Cream:
Put the white chocolate in a heatproof bowl and put the bowl over a saucepan of gently simmering water. Stir frequently to melt the chocolate evenly. Meanwhile, bring 1/2 cup of the heavy cream to a boil.

When the white chocolate is melted, remove the bowl from the pan. Pour the hot cream into the melted chocolate and let it sit for a minute. Using a small spatula, stir the chocolate gently until it is smooth. Let it sit on the counter until it reaches room temperature--it can't be the least bit warm when you add it to the whipped cream.

Working with the stand mixer with the whisk attachment or with a hand mixer in a large bowl, beat the remaining 1 cup heavy cream only until it holds the softest peaks. Turn the machine to high, add the cooled white chocolate all at once and continue to beat until the whipped cream holds firm peaks. Turn the whipped cream into a bowl, press a piece of plastic wrap gently against the surface to create an airtight seal and refrigerate for at least 2 hours, or up to 6 hours.

To Assemble the Cake:
If the tops of the cake layers have crowned, use a long serrated knife and a gentle sawing motion to even them. Slice each layer horizontally in half. Place one layer cut side down on a cardboard cake round or on a cake plate protected by strips of wax or parchment paper.

Remove the dark and white chocolate creams from the refrigerator and whisk each of them vigorously to loosen and smooth them. With a long metal icing spatula, spread enough dark chocolate cream (about 1 cup) over the cake layer to cover it completely. Top the cream with another cake layer, cut side up, and cover this layer with white chocolate whipped cream, making the white layer about the same thickness as the dark layer. Cover with a third layer, cut side up, and cover with another cup of so of the dark chocolate cream. (You'll have some dark chocolate cream left over--use it as a dip for madeleines or sables). Top with the final layer of cake, cut side down, and frost the sides and top with the remaining white chocolate whipped cream. If you'd like to decorate the top with chocolate shavings or curls, do it now.

Refrigerate for at least 3 hours, or overnight.

Friday, August 26, 2011

Good Thing to Know

You can substitute powdered sugar for regular, granulated sugar. 1c regular = 2c. powdered

Yes, somehow I'd run out of regular sugar. No, I don't know how that happened.

Friday, June 10, 2011

Cheap Therapy

I didn't get a lot of sleep last night ( will the teething end?), so I have been wicked grumpy today. One thing that helped was swimming laps in the pool while the girls played at the drop-in daycare. And while I was doing the backstroke, I decided that I really needed to bake something. I didn't need to bake something to fill a sweet craving, but I needed the act of baking to make me feel better.

It's been this way for years now. In addition to haircuts, pedicures, buble baths and new lipstick, baking has become a form of cheap therapy. Well, not so cheap with rising food costs, but probably still less expensive than a co-pay and prescription.

I sew because I like to make new clothes for myself or challenge my skills with a more advanced pattern. I make things for the girls because I like to see their faces light up. Yes, I bake because the finished product makes other people happy, but there's something else there.

As I've said before, my mom was a huge baker. I have pictures of a grade-school birthday party whe she made Raggedy Ann and Andy pan cakes (fully hand decorated) for me and a boy in my class who had a birthday the day after mine. Every year, after Thanksgiving, my aunt and I would go to my mom's house for "CookieFest", where we made a holiday's worth of cookies. So, there's definitely a nostalgia aspect to baking, but I think it's much more than that.

I like the mix of senses, tastes, textures, flavors. I like taking basic ingredients, like butter, eggs, flour, sugar, and making something new when I combine different amounts of them. I love the way my house smells when there's something in the oven. I love the tangible end results.

I guess, in the end, it doesn't really matter why I do it, as long as it continues to make me happy. And the Boy happy. And the girls happy. And my friends and family happy. Because part of baking is putting yourself into what you make and being comfortable enough to share.


As a side note, my theraputic baking today was a Braided Fruit-Filled bread from King Arthur. I used sour cherry preserves instead of lemon curd. It's amazing to eat and smell and look at.

Monday, March 7, 2011

Cheesecake Bars and Chocolate Angel Food Cake

Cheesecake is another one of those easy-but-takes-a-while things,but it's so totally worth it. I made King Arthur Flour's Vanilla Cheesecake Bars for a Mom's Night Out and got rave reviews. My friend V wants a standing order for each month.

I highly recommend using the lemon peel and juice in the recipe. It doesn't add a real strong lemony flavor, but it gives a nice complexity to the vanilla and creamyness that I really like. The next time I make these, I might try another marble variation, using that Justin's Chocolate Hazelnut Butter and chocolate wafers for the crust.

I had a bunch of egg whites left over, so I decided to try my hand at a Chocolate Angel Food Cake. The recipe from Pie in the Sky has consistently worked for me, so I started with that. I was a little worried about replacing some of the flour with cocoa powder, since flour is really necessary to create the proper structure at high altitudes so the cake doesn't fall. I decided to go for it, and replaced 1/3 cup of floiur with cocoa powder and made sure to underbeat the egg whites, per the instructions, so they'd have plenty of room to expand while cooking.

It worked! The chocolate flavor isn't overhwelming, but nice and light, like you'd want in an Angel Food Cake. I kept the almond extract, since I love that combination, and next time I might try the orange zest and flavor substitution.

Tuesday, March 1, 2011

Chocolate Caramel Pie

I'm always on the lookout for easy, delicious, chocolate-based recipes. I should clarify that, to me, there are two tyoes of easy: quick and easy and time-consuming and easy. Brownies are quick and easy. Truffles are time-consuming and easy. This insanely good Chocolate Caramel Pie is easy and time-consuming. And you should make it right away.

It's not too sweet, even with the layer of caramel. The pudding is nice and rich and the whipped cream top has just a touch of brown sugar and cocoa, but is a camy counterpoint to the rest of the components. It's also pretty on the plate, with the different distinct layers of tastyness.

It's great with coffee and also with a glass of red wine and some hysterical conversation with your friends.

Tuesday, February 22, 2011

Creamy Chocolate Cake

Or, what I do for PMS...


I love me some chocolate, and the cravings can be downright overwhelming sometimes. This cake, while not instant gratification, will do the trick. I found it in Dorie Greenspan's Paris Sweets, which is a collection of pastry recipes from some of the best shops in Paris. So, if you can't afford the plane fare, pop in Amelie and bake something from the book.


This is Grandmother's Creamy Chocolate Cake from Robert Linxe.. It's dead easy, with ingredients you probably have in your kitchen. Butter, sugar, chocolate, eggs, and flour. Seriously, that's it.


It's not bake and eat, you have to wait for it to cool, then chill in the fridge, but it's totally worth it. I like to keep it in the fridge and eat it cold, so it's more fudgy, but it does lose a bit of the crunchy top that way. However, it is easier to hide from your chocolate-loving children when it's hidden on one of the upper shelves in the fridge. Because you won't want to share. Trust me on this one.

Thursday, January 6, 2011

A Twist on the Marble Cheesecake

I'm in between projects right now, trying to clean up from the holidays, recover from the double-whammy of a cold and a sinus infection, and getting into a new preschool routine with the Bean. However, I realized I never blogged about the marble cheesecake I made with that Justin's Chocolate Hazelnut spread.

I started with Gale Gand's Marble Cheesecake recipe, and substituted 6 oz. of the spread for the chocolate. It was divine. (I do have to admit it cracked more on the top than I'd like, but I think that's just a high-altitude thing or not using a water bath.) All my friends moaned with delight when they ate it, so I'm guessing they liked it, too.

And on a sewing note, I've given up on trying to sew the perfect v-neck t-shirt. In all honesty, with my lifestyle and sartorial style (is that an oxymoron?), it's much easier to buy a shirt from Old Navy, then adjust the shoulder seams so it's not so low cut.

I got Built by Wendy's book on sewing with knits on massive sale and I'm eager to see what she has to say. Maybe I'll get that dream shirt after all...