Monday, November 11, 2013

Peter Pan Quilt

A good friend of mine is in the process of trying to add a new member to her family, which means daydreaming about the nursery (i.e. pinning ideas on Pinterest). She's decided to go with a "Peter Pan" theme, a fun, whimsical theme that suits either gender.

Me, being me, decided to make a quilt for her, one that could be used as a wall decoration, place to crawl around, or even for snuggling. I found a great one with 5 panels--the Big Ben clock, the Darling children flying, Peter Pan flying, Captain Hook and the Indian Chief in the clouds, and, of course, Tinkerbell. I found coordinating star and stripe fabrics and one with famous phrases from the book.
I quilted around the shapes in the main panels, stitched in the ditch around the stripe sashing and sewed alternating stars and hearts in the blue rectangles. 

The back is a thick knit in two shades of blue and I used a thick batting for extra protection from bumps on the floor.
From Minus Minions

My friend loved it! Time will see how the future little one reacts to it.


Monday, November 4, 2013

Monster Cookies

Halloween treats are a bit tricky for little kids. How scary is too scary? How much sugar do can they eat before they go completely crazy? How much food coloring do you want them to eat?

I signed up to bring in treats for The Belly's Halloween party at preschool this year and started going through my Pinterest board, to see what I'd pinned, then promptly forgotten. Her older sister was looking over my shoulder and declared I should make the Ooey Gooey Monster Eye Cookies. They're cake mix cookies, with a good dose of cream cheese for extra chewiness, and fun colors and sugar eyes. I found a set of the smaller eyes and we did a practice round. Just to make sure, you know?
I wasn't crazy about the cream cheese flavor, but I think that's just a matter of personal taste. They were a big hit at the party. Just the right balance of fun and spooky. You can find the candy eyes at craft stores (and even Target) so it's a great recipe for a monster-themed birthday party or for one of those days you need a smile.


<


Thursday, September 5, 2013

Vogue 8942: The Frog Purse

  Sometimes I'll make something just for the experience of making it. I know I probably won't use or wear it, but something inside me told me to sew or bake or cook it, regardless of the benefits. This is one such project.

I know that I am most likely too old to carry off a frog purse. I also like my clothes and every day accessories streamlined and easy to wear. None the less, when I saw this Vogue frog purse pattern, I knew I had to make it. Just like the frog quilt from a few months ago.
   

The pattern has a lot of pieces, especially small pieces, but they slide together fairly easily. If you do decide to make this, or the owl version, use denim (or other sharp and strong) needles. I broke at least three universal needles trying to sew through a zipper tape/interfaced wool/tri-folded suede sandwich. Also, as you can see a bit in the second picture, my suede tended to fray, but the pattern doesn't call for encasing the raw edges, so either break out the Fray Check or serger, or choose a fabric that won't fray easily.

Time will tell if this cute guy gets any use. It has three pockets in addition to the main opening, which is always a bonus. Maybe I'll take it for a trial run when the weather gets colder. Wool houndstooth, even in frog form, is not made for 90 degree days.

Wednesday, August 28, 2013

Ottoman Slipcover, aka lemonade out of lemons

 We have some nice, club-style leather furniture in our family room: a loveseat, sofa and chair set. I got The Boy a somewhat-matching ottoman a few years later. We have some red suede throw pillows for accents and it all looks really nice and cozy.
However, the ottoman got worn and developed a rip in the top. There was a suggestion for a slipcover and I got right on it. I figured, "Hey, how hard can sewing a basic slipcover for a cube be?" (Cue evil laugh from sewing gods.)

I measured and made some sketches. After some rudimentary math, I left the girls with a babysitter (since The Boy was out of town) and headed out to thefabric  store. I found some red suede that looked like it would match the throw pillows and some dark brown cord trim to tie it back to the chair. I was all ready to sew five pieces of fabric into a simple geometric shape. It would be a cinch! Yeah, no.

I soon realized I hadn't bought enough fabric (or a few notions for another sewing project). After a little sulking, I figured I'd just order fabric from Fabric.com, enough to start the whole thing over. Well, a few days later, I got an email from them saying one thing I'd ordered was out of stock and did I want the rest of my order or to just cancel the whole thing? I saw this as a sign, packed up the girls and made the quickest fabric store visit I could.  

Unfortunately, I got the wrong color of red suede fabric, more of a cherry red than a dark red. After a few choice words in my head, I decided to just make it work. I cut the fabric into strips to make a tone-on-tone stripe. And it actually looked really good! I had a bit of trouble with the cording, breaking a few needles along the way, and accidentally sewing it around a side instead of the top, but I worked though it.
I'm honestly surprised by how well it turned out. Granted, I can see all the little imperfections and know how long it took to make, but I'm pleased overall. It really looks nice with the dark furniture and light carpet. Just the right touch. 

Friday, July 26, 2013

Soot Sprites

  I'm a sucker for animation and the girls have inherited this trait. Somehow we introduced them to The Secret World of Arietty, which led to  Ponyo, which led to My Neighbor Totoro, which led to Spirited Away. If you haven't seem them, I highly recommend a trip to the library to check some of these out. 

There are these little fuzzy creatures, called Soot Sprites, in Totoro and Spirited Away, that crack my kids up. They scurry around on spindly legs and have large, saucer-like eyes. Basically, like spiders but much cuddlier. I found a tutorial and decided we needed to have some of our own.

They're insanely easy and cute. I'd bought some stuffing, fuzzy black fabric, black cording, white felt and black beads but didn't get around to making them until one day when we all had a bit of a cold and I thought the girls needed a bit of cheering up. 
I highly recommend dipping the ends of the cording in glue, modge podge or clear nail polish to keep them from fraying. I had to do some emergency amputations of two soot sprites after quiet time that day.

This has been one of my most re-pinned Pinterest entries, and it makes me very happy to think of all these little guys hanging out around the world.

Tuesday, July 23, 2013

Rock Candy Experiment

The egg shell geodes were such a big hit, the girls wanted to make them again, only bigger. I got the idea to make rock candy--in other words, geodes they could eat!

I raided out cabinets for glasses that were narrow and tall enough for the string to be covered in enough sugar syrup. Three champagne flutes and a glass mug worked perfectly.


It was difficult to keep the girls from wanting to eat the candy until it was ready. Patience doesn't come easily to four- and five-year olds. After about five days, though, there were enough crystals to see and eat and there was much sugar-fueled rejoicing.

It was a fun experiment and next time, if there is a next time, I'd try wooden sticks or try to find a way to keep the string straight instead of curling up. It did take longer for the first crystals to show up and I wonder if that's because the cups were near the air vent in the kitchen and it was a bit more humid with the AC on.

Now, what to do next...

Tuesday, July 16, 2013

Homemade Marshmallows

  The girls have been on a marshmallow kick lately. No roasting or toasting required, just eating one or two straight out of the bag for a treat. For the 4th, we were going to have friends over for grilled steak, wine and sparklers, so I figured we'd set up the fire pit and make S'mores. So I decided we could make homemade marshmallows for a fun activity.

Between trying to keep kids away from the boiling sugar syrup, beaters and other kitchen dangers, I didn't get any pictures of the process. But, the Barefoot Contessa's recipe isn't that difficult (and doesn't use egg whites, for those who sure vegetarian  or have allergies), just fairly sticky. Next time, I'll probably spray the pan with vegetable oil, then dust with powdered sugar because mine stuck to the sides and wouldn't slide out of the pan when I turned it upside down.

Tip: Use a pizza cutter (or thin, sharp knife) sprayed with vegetable oil and cutting is a breeze. I tossed them in a little more powdered sugar and had no problems with them sticking together.

Everyone agreed they were the best marshmallows they'd ever had. My friend's toddler kept grabbing the bag and stuffing them in her mouth (which is one way to keep little ones awake for fireworks).


I think these need to be part of my holiday baking routine, maybe flavored with peppermint and dipped in chocolate. 

Thursday, July 11, 2013

Eggshell Geodes

  Summer has sapped my will to write. It seems more important to sit on the porch playing a hidden object game or take the girls to the pool. I have been crafty, but just don't have the willpower to write about it.

Anyway, the girls love geodes. Their granpa gave them a big, purple one and they have to see all the "shiny rocks" when we go to the science museum. I found a homemade eggshell geode activity in my Pinterest list and decided the girls would love it.  They did; infact, they loved it so much we did it 2 weeks in a row.

I found a recipe on The Happy Scientist that uses epsom salts instead of borax or alum. The first time we did this, I used 6 eggshells. They worked really well, but don't hold up well in little hands. The second time, I raided our stash of plastic easter eggs, sticking some duck tape on the bottom to seal up the holes.

It was a lot of fun and the girls were incredibly excited to see how everything turned out. I think I didn't get the water hot enough the first time as the crystals didn't turn out all that well. The second try was much better. And now, I have lots of epsom salts for a relaxing bath. It's a win-win!

Monday, June 17, 2013

Racing Shirts Quilt

 I was never really an athletic kid. I played a bit of soccer, but not all that well. I swam a bit in high school, but never on the first-string team. A few friends started doing Couch to 5k last year, so I tried it, too.  I signed up for a few races, then a few more, and, somehow, a year has gone by.

I'm not a big novelty t-shirt person; I knew I'd get a lot of race shirts I wouldn't want to wear. I got a great idea: make a t-shirt quilt with all my race shirts and embroider my finish time on each square. Twelve months and 12 races later, I finished it. 


A year later, I'm still not ready to run a marathon (or even a half marathon) but I'm definitely ready to try to got for a personal record at every race.

Thursday, June 13, 2013

Fairy Houses

  Summer vacation is here which means lots of playing outside, no schedules and tons of free hours to fill. This summer, I'm going to try to do one fun art/craft/science activity each week. A.K.A.: Time to see what things on Pinterest really work.

The first week was fairy houses. The Bean had been ally into making a hiding spot for fairies in our front shrubbery so I thought she'd like to decorate an actual structure. I loaded up on coupons from JoAnn's and we picked up a few wooden bird houses, paint, shiny rocks and other fun, pretty decor. I let the girls paint the outside however they wanted before we had fun with the glue gun. I set the glue gun on low, put a good glop where it was needed and let the girls place what they wanted there.

I love the feathers and grassy puff balls and the shiny rocks are beautiful. I don't know if any fairies have set up shop, but they add fun to our front yard.

Thursday, May 30, 2013

Rainbow Cutie Mark Cupcakes

  The girls wanted a My Little Pony birthday party this year. It was pretty easy, actually. A unicorn piñata, "pin the horn on the unicorn" and some foil swirl decorations from Amazon (very thankful for Prime and free shipping!) and food from the grocery store and we were good.

We had about 14 kids and 10 or so adults. For a party made up of mostly four- and five-year-old kids, it went amazingly smooth. All the kids, all girls and one boy, played baseball with Grandpa, popped bubbles from the bubble machine and had fun playing dress up. There were no serious meltdowns, just a few normal bouts of sniffles and pouting. I probably used up all my karma, but it was so much fun.

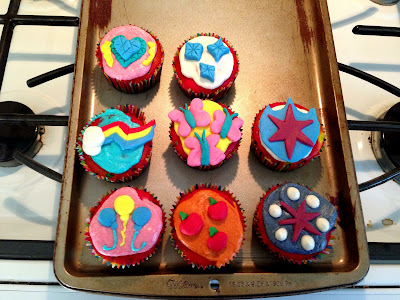
I prefer cupcakes for kids' parties--they're the right size, already portioned out and no on pe has to wait for it all to be cut up.  This year since it was a My Little Pony theme, I made Rainbow Cutie Mark cupcakes. (Cutie marks are the designs on each pony's rump, usually depicting his or her talent.) I just used a white cake mix for the cupcakes, fondant for the designs and frosting for the tops and some design accents. Oh, and food coloring. Lots and lots of food coloring. I got lots of help and inspiration from the Nerdy Yummies video on YouTube.


This was my first time working with fondant. It was pretty easy, much like playing with Play-Doh. My hands were stained for a few days from the gel food coloring, so I'd definitely use gloves next time. I think they turned out nicely, although the butterflies are a tad too large.

For the cupcakes, I made the mix according to the box directions and divided it into six bowls. I tinted each portion a different color: purple, blue, green, yellow, orange and red. I put a scant teaspoon of each color in the cupcake liners, layering    each color. The gel colors turned out really vibrant. All the kids were very excited to pick out and eat one!

Now I have another whole year before I get to do it again.


Wednesday, April 24, 2013

Serged Infinity Scarf

  The final project in my serger class was an infinity scarf made with a knit and ribbon accents on one side and a woven on the other. The ribbons are woven through the ladders of a flatlock stitch and the top and bottom are sewn with a regular overlock with some decorative thread.

I wanted to do something other than my usual black/white/grey pattern fabric. I found a beautiful flower fabric in the quilting section. It had red, grey, pink and yellow; colors I can fit into my usual clothing rotation but different enough for a little oomph. I found a pretty red interlock and grey satin ribbon and bulky nylon thread.
It was really easy to make. So easy, that I decided I needed another one. I raided my stash and found a bunch of my favorite Paris map fabric and some soft black knit. I made this one a little narrower and used a white grosgrain and some of the leftover grey satin ribbon.

I really love these. I hope the Infinity Scarf trend doesn't peter out next fall so I can wear these all the time.

Tuesday, April 9, 2013

Ombre Ruffled Apron

  My second project in my serger class was an ombre, ruffled apron with rolled hems. I wrote down the wrong number of  colors so I only had four ruffles instead of five. I made it work with a bit of math and a drawing to help me visualize. I chose a bunch of shades of pink and got some fun variegated pink and white decorative thread.

It's definitely a learning curve. There are so many more variables and pieces than in my regular sewing machine. it's like learning to drive a stick shift after learning how to drive an automatic transmission. I made my ruffles a bit tights so I had to slide them on the thread tails a bit to get them the right width. I had to play around with the tensions to get the rolled hem right. 

It turned out really cute, even with all the frustrations. I think I can adapt these techniques to make some cute ruffled dresses and skirts for the girls.

Wednesday, April 3, 2013

Easter Cookies

  For our annual Easter Egg Hunt last weekend, I wanted to make a fun, cute, kid-friendly dessert. Last year, I made cupcakes (which I apparently didn't write about...) and the year before I made Bunny Cake Pops. This year, I was inspired by the King Arthur Flour catalogue and made Easter Cookies.

I used their Sugar Cookie and White Icing mixes with some Wilton cookie cutters. I made the dough one day, rolled them out and baked the next day and decorated on the last day. I wanted to try the "flood icing" technique, but I don't think my royal icing was runny enough and I didn't feel like mixing all my colors twice, so I just went with it. I piped the frosting, spread with a knife and smoothed out any bumps with a wet finger. They turned out really cute, if I do say so myself.


Thursday, March 28, 2013

Exposed Zipper Bag

I haven't been sewing much because I bought a serger a few months ago and I've been trying to figure out how it works. I made the mistake of using it for something that was probably more suited to a regular sewing machine and got really frustrated.  It stayed in its plastic covering and I tried to figure out what to do.

A good friend suggested Craftsy. They have lots of online classes, for everything from pattern recreation to cake decorating. I signed up for a beginning serging class, assembled my machine and got ready to learn.

It's awesome. The instructor, Amy Allen, is so friendly and helpful. The projects are useful and all the handouts are clear. I feel much more confident now.

The first project was an exposed zipper bag. I got a couple fat quarters, b/w houndstooth and a blotchy pink, a black zipper and four cones of black thread. It was fairly quick and easy! My zipper seam allowances aren't completely even, but I'm probably the only person who really notices and cares. I'm totally going to get more supplies and make more of these.


Friday, March 1, 2013

Peppermint Marble Loaf Cake

I love the combination of peppermint and chocolate. The York Peppermint Patty creamer makes me very happy in the morning. This easy marble loaf cake is like the creamer in cake form. 

Marble Loaf Cake Recipe from Baking From my Home to Yours by Dorie Greenspan

Ingredients

2 Cups Flour plus 2 Tbsp All-Purpose Flour
1 ¼ tsp Baking Powder
½ tsp Salt
1 ½ Sticks (12 Tbsp) Unsalted Butter, at room temperature
1 Cup Sugar
4 Large Eggs
½ tsp Pure Vanilla Extract
½ Cup Whole Milk
4 oz Bittersweet Chocolate, melted 
4 oz White Chocolate, melted
1/4 tsp Peppermint Extract

Method

Preheat the oven to 325˚F. Butter an 8 ½ x 4 ½ x 2 ½-inch loaf pan, dust the inside with flour and tap out the excess. Place the pan on an insulated baking sheet or 2 regular baking sheets stacked one on top of the other.

Whisk together the flour, baking powder and salt.

Working with a stand mixer with a paddle attachment, or with hand mixer in a large bowl, beat the butter on medium speed until smooth, about 3 minutes. Add the sugar and beat for another 2 to 3 minutes. Add the eggs one at a time, beating well after each addition. Don’t be concerned if the batter curdles and stay curdled-it will be fine. Beat in the vanilla. Reduce the mixer speed to low and alternately add the flour mixture in 3 additions and the milk in 2 (begin with the dry ingredients), mixing only until each addition is incorporated.

Divide the batter in half and stir the melted bittersweet chocolate into one half and the melted white chocolate and peppermint extract into the other. Drop spoonfuls of dark and light batter randomly into the pan, and then plunge a table knife deep into the batter and zigzag the knife through the batter. For maximum peppermint contrast, only zig and zag a few times. 

Bake the cake for 1 hour and 20 to 30 minutes, or until a thin knife inserted deep into the center comes out clean. If the cake looks as if it’s getting too brown during its bake, cover loosely with a foil tent. Transfer the cake to a cooling rack and let it rest for about 15 minutes before unmolding, then cool the cake to room temperature right side up on the rack.


Wednesday, February 20, 2013

Fabric Headbands

  A new year needs new hair, right? I decided to chop off my hair into a fun pixie cut a few weeks ago. I really love it. It's so easy to take care of, but I do still have an occasional bad hair day. I decided to make some headbands to hide any crazy poufs or just liven up an outfit.

 I found a pattern at Happy Together for a double-sided fabric headband. I prefer headbands that tie, because the elastic ones scrunch up too much, especially with short hair.  I taped the two pattern pieces together and then extended the end a few more inches. I left a 3-inch opening near the middle for turning. The Dritz turning tools came in very handy here. A little topstitching and I was all done. Two headbands took about 20 minutes and were free since I used scrap fabric.

I figure this wide-headband look will be very popular with the new Great Gatsby movie coming out soon. Who can't use a little 20's glamour in her life?
From Minus Minions
From Minus Minions

Monday, February 11, 2013

Frog Quilt

  Dude, where has the time gone? I got sucked into the holidays, dealt with the girls having massive colds, then found myself with fatigue and a touch of writer's block. However, I finished a few projects, one big and a few small, and I'm ready to write again.

I like frogs. My maternal grandmother collected frog figurines and when she passed away, my mom gave me some of her collection. I've expanded it a bit and have some froggy touches around the house. Naturally, when I saw the "Infrognito" quilt pattern, I had to have it. I decided to go with a different color combination, opting for more greens, blues and purples. I got a bunch of batik fat quarters, grabbed by rotary cutter and went to town.


I think this is one of my favorite projects ever. I love the color combinations, the whimsy, and how soft it is. I used a double thickness of a low-loft batting, so my hand-quilting stitches aren't nest and tiny, but the payoff is how cozy and warm the quilt is. It's perfect for curling up on the couch. I stitched in the ditch, so there are fun outlines of frogs on the back.

It went together pretty easily. The shapes are all straight lines, making rotary cutting easy. The big frog and all the eyes are attached with fusible webbing. I drew the eye details, like the pupil, with fabric marker.

 I might have to make this again, with other colors.